
I reworked mine several months ago, as the previous owner had ripped out everything in an attempt to wire them to work sequential-less. I almost went crazy before I found that the motor needs to be running for them to work properly. At least mine, anyway. Makes no sense to me but it works!
- Welcome to SAAC Forum.
News:
SAAC Member Badges are NOW available. Make your request through saac.memberlodge.com to validate membership.
This section allows you to view all posts made by this member. Note that you can only see posts made in areas you currently have access to.
#2
1968 Shelby GT350/500/500KR / Re: Conv windshield header finish.
March 16, 2022, 06:16:06 PM
Thanks Bob!! I'll probably go the "paint as close as possible" route.
#3
1968 Shelby GT350/500/500KR / Conv windshield header finish.
March 16, 2022, 06:01:43 PM
Any ideas out there on refinishing my 68 conv windshield header? Mine's pretty badly pitted. Was Satin chrome the original? CJ has a bright chrome replacement. I tried posting a pic but there must be a problem. 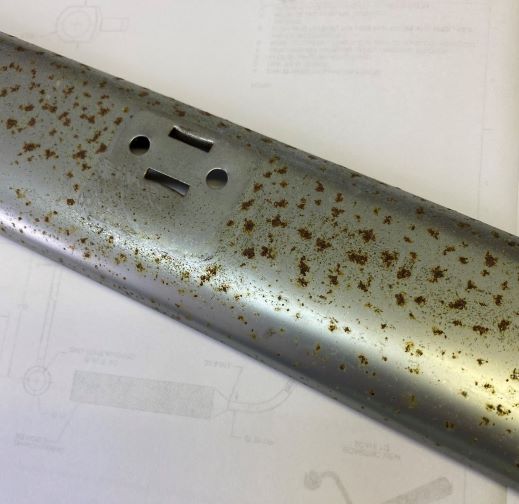
#4
The Lounge / Re: What was your first Shelby/Cobra?
September 28, 2021, 01:30:52 PM
1968 GT350 Conv, Gold Met with black inside. Auto
Bought in 1974 when I was 17, in Anniston, Alabama. Traded a 1955 Chev Belaire and $2000 to used car dealer for the Shelby. I paid $850.00 for the Belaire.
Still own the car. It has 115K miles. Original except for wear and tear. Hubcaps, CI intake (never been off), Autolite carb. Currently tidying it up (new belts, hoses, top, front seat covers, weather stripping, etc.
Listed in the 1968 Shelby Registry.
#5
1968 Shelby GT350/500/500KR / Re: 1968 reproduction rear bumper- Junk
September 28, 2021, 12:57:58 PMQuote from: Coralsnake on August 28, 2021, 10:52:27 AM
Just curious are you expecting the bumper to be higher?
Its designed to have that gap.
The original bumper had about half this gap.
#6
1968 Shelby GT350/500/500KR / Re: 1968 reproduction rear bumper- Junk
August 28, 2021, 09:41:10 AM
I just got a rear bumper from Branda and had the same fitment issues. used shims between the bracket and bumper to help. Now the issue is the ends are about an inch below the end caps. I can't raise it by shimming because it is almost up against the taillight panel. Probably all these repros come from the same manufacturer. Mine has a Taiwan sticker on it. I would have re-chromed the original bumper but is has a dent in it.
#7
1968 Shelby GT350/500/500KR / Re: Taillight grounding
August 28, 2021, 09:09:35 AM
Thanks everyone! I realize now (duh!) that the ground is thru the die casting!
#8
1968 Shelby GT350/500/500KR / Re: Taillight plates covering the sockets
August 20, 2021, 10:58:48 AM
What about the screws that attach the glass taillight to the body?
#9
1968 Shelby GT350/500/500KR / Re: Post a picture of you 68 Shelby
August 20, 2021, 10:56:42 AM
Nice!
#10
1968 Shelby GT350/500/500KR / Re: Taillight plates covering the sockets
August 19, 2021, 05:41:42 PM
They are a #8 x 1/2", flanged oval head screw. I am currently looking for them as well. I think it is the same screw that holds the glass taillight panel in place.
Grainger has something close, although the flange is slightly larger diameter.
https://www.grainger.com/product/FABORY-8-x-1-2-in-Zinc-Plated-Case-31JM26
Grainger has something close, although the flange is slightly larger diameter.
https://www.grainger.com/product/FABORY-8-x-1-2-in-Zinc-Plated-Case-31JM26
#11
1968 Shelby GT350/500/500KR / Re: Taillight grounding
August 19, 2021, 10:17:02 AM
But the housing is non-conductive fiberglass, isn't it?
#12
1968 Shelby GT350/500/500KR / Re: Post a picture of you 68 Shelby
August 19, 2021, 09:22:02 AM
Not the most recent pic. Original paint.
#13
1968 Shelby GT350/500/500KR / Re: Taillight grounding
August 19, 2021, 09:20:18 AM
Thanks for the input, but I still don't understand what completes the circuit between the taillight sockets and the ground wire screw. Is there a metal insert that has been molded into the fiberglass?
#14
1968 Shelby GT350/500/500KR / Taillight grounding
August 18, 2021, 10:53:26 PM
Maybe I am missing something.......But since the taillight panel of the 68 is fiberglass, how are the taillight sockets grounded? I know there is a ground wire in each side's taillight wiring harness, but it appears to just screw into a hole in the fiberglass. How is the ground circuit completed between the socket and the ground wire? Can anyone shed light on this?
#15
Appeals / Searching for 68 GT500KR
May 26, 2021, 11:27:56 AM
A good friend's dad at one time owned 68 GT500KR #03781. According to the Shelby Registry it sold new in Anniston Alabama. Anyone know of the whereabouts today?